Monday, May 24, 2021

M62 - Globular Star Cluster

Messier 62 is located in the southern constellation of Ophiuchus. It was discovered by Charles Messier in 1771. It lies at a distance of about 22,000 light years from earth and has a diameter is 110 light years. Its estimated mass is one million solar masses and it contains over 200 variable stars. In 2013, astronomers discovered a stellar-mass black hole in M62, one of the first to ever be found in a globular cluster.

M62 - May 21, 2021
Celestron EdgeHD11 f/10 and ASI2600mm camera
20x30sec RGB subs and 33x30sec Lum


With a Declination of -30 degrees, this was a difficult object for me to capture as it never gets more than 25 degrees above the southern horizon and I have very limited view in that direction to boot. I wanted to capture at least 40-60 luminance subs, but with the limited view and not very ideal weather conditions I settled for only 33 good ones to go with the 20 RGB subs.

This one deserves much better treatment (and longer integration time) but it is on my list for the M110 award at TSS and I don't want to wait another year to complete that contest.

Sunday, May 23, 2021

NGC 6229 - Globular Cluster in Hercules

NGC 6229 is a very distant globular star cluster in the constellation Hercules. At about 100,000 light years away it is one of the furthest clusters from earth (that is, cluster in our galaxy) sitting at the very edge of our Milky Way. The Stellarium planetarium software identifies it as the "Prize Comet Globular Cluster" - possibly because of its distance, and hence small size, it would look like a faint comet head in smaller amateur telescopes.

NGC 6229 - May 21, 2021
EdgeHD-11 f/10 ZWO ASI2600mm
30x30sec RGB; 60x60sec Lum


This image was taken with a 9.8 day old moon blaring in the west and cirrus clouds covering most of the sky. Not ideal conditions, but whenever you get a mostly clear night here in Maryland you try to take advantage of the opportunity as best as you can. Globulars are ideal for image objects in these conditions as they tend to hold up well to the sky brightness and LP. 

Saturday, May 22, 2021

The Lunar-X

While testing out the new adjustments I made to my mount software and camera hardware, I took a quick image of the moon. Wasn't really interested in keeping them, they were just for testing focus points, But then I noticed that I had captured the famous Lunar-X (and Y). They are optical features on the moon, visible when the moon’s terminator, the position between light and dark on the moon, is located in just the right place, you can see what appears to be the letters "X" and "Y". A serendipitous capture, I post-processed a single frame and posted here.

Lunar X and Y
EdgeHD-11; ASI2600; 0.002 seconds f/10
May 18, 2021 - 8:10 PM

Close up


For more information on the Lunar-X see the article in EarthSky.

Monday, May 17, 2021

The Blowdryer Galaxy (M100)

No, I didn't name this galaxy. It is one of the popular names for M100. But it does look a little bit like a blowdryer.

Names aside, this is one of the Messier objects on my list to image. I'm trying to get the final Messier Award, the M110 Award, for photographing all 110 Messier objects. With eleven more to go it may be a challenge to complete the series this season if the weather doesn't cooperate soon. 

This image of M100, also known as NGC 4321, is a spiral galaxy in the constellation Coma Berenices. One of the largest and brightest galaxies in the Virgo cluster, it is 55 million light years from earth, and spans 107,000 light years across.

Taken over two nights, May 1 and 2, 2021, it was a difficult imaging run as clouds interfered throughout both nights - more than half of the exposures had to be discarded because of either low signal (clouds) or equipment failure. My new Off Axis Guider is giving me fits trying to get the image focused sufficiently for the guide system. But I'll get it sorted out someday :) It was, nonetheless, a good test of my new camera, the ZWO ASI2600mm Pro. 

M100 - May 1 and 2, 2021
EdgeHD11 2800mm f/10, ASI2600 Camera
LRGB 3.2 hrs total integration
Full details at: Astrobin


Friday, April 23, 2021

Final Test of the ASI2600

M63 - Comparison ASI2600 vs. ASI1600

As a final test of the ASI2600 I decided to compare the results I obtained imaging M63, the Sunflower galaxy using the ASI2600 with the same object using the ASI1600.  Both images had pretty much the same number of subs, all taken with 60sec exposures. Each was calibrated and processed using the same workflow. 

First, a comparison of the field of view (FOV) of each camera. Note that both images were cropped a bit during postprocessing as needed to account for slight shifting of the masters among the multiple filters and to eliminate vignetting at the corners. As reported in my previous post, I was pleased that the vignetting due to the use of 31mm filters was minimal. The ASI2600 has a wider FOV, mainly in the long axis. The images below are not exactly to scale; the ASI1600 had more cropping than the ASI2600, so the change in FOV is a little bit exaggerated. The actual sensor sizes are:

ASI1600:  4656x3520
ASI2600:  6248x4176


Next, with some cropping of the ASI2600 image to bring the scale of each closer to 1:1 we can examine each for actual image details. Please note that the sky conditions were not completely identical in each session and so there may be some differences due to quality of subs, not the actual difference in the sensors.


However, some of the 'promised' improvements in the ASI2600 over the ASI1600 can be seen. First, the artifacts due to the microlens light scattering in the ASI1600 are completely gone in the ASI2600 (see bright star just to the right and above the galaxy). Second, the overall brightness of the galaxy is greater in the ASI2600, likely due to the greater quantum efficiency of the 2600 over the 1600 (91% vs. 60%).

In addition, but not obvious in these quick comparisons, is the much lower noise in the ASI2600. Dark frames were consistently measured as 500ADU, across all typical durations (30sec - 1200sec)! And, the total absence of any amp glow makes post-processing even easier.

One thing that is noticeable in the 2600 image is the size of the stars - they are bigger than the ones in the 1600 image. This might be due to slightly different post-processing. Another contributing factor may be the lower full well capacity of the ASI2600 at gain of 100.

Overall, I am very pleased with the performance of this new camera. 

Saturday, April 17, 2021

ASI2600 Testing Continues

Test of new OAG spacing

You may recall in my last post I had discussed the plan to reset the spacing of the ZWO OAG on the scope to help with the strong vignette of the guide scope camera image. I moved the 15mm spacer in front of the OAG, mounting the OAG flush with the filter wheel. A thin 0.5 mm spacer was used between the nose piece and the 15mm spacer to act as a stop when the assembly was attached to the Moonlite 2" adapter. As expected, the pick-off prism is now rotated a bit from the center of the sensor's long axis.

Although this did improve the guide image, there is still an obvious vignetting present. The ZWO prism and light guide are just very small compared to the Celestron OAG.

Gain Settings

Early Friday morning I imaged the Sunflower galaxy, M63, so that I could compare the results of the ASI2600 with the image I took with the ASI1600 back in March. I ran a similar set of LRGB subs, 60sec exposure, but I used Gain 0. It turns out that these subs are essentially useless as I needed either a longer exposure time, or higher gain setting. The images did look rather nice, but they couldn't be stretched in postprocessing since they lacked sufficient dynamic range.

The darks at Gain 0 on the ASI2600 produce frames of 500ADU average at -10C. The 60sec lights of M63 came in at 520-560ADU. This means that once the dark frame data is subtracted from the light frames the net result will be only 20-60ADU. This is extremely low signal content, especially with a camera that has a 16bit ADC (0-65535). Any amount of stretching to bring out the faint details will produce a final image that is extremely 'posterized'.

To illustrate the point, I took a few subs of the Blackeye galaxy, M64, last evening during a very short period of clear skies in that direction. Clouds interfered with the 60sec gain100 sub so I couldn't do a comparison with the 60sec subs.

Three subs, 60secGain0, 120secGain0 and 120secGain100, are shown in the image below. A quick stretch of each was made to bring out the details. As you can see, the images themselves seem pretty nice. But this is misleading as each stretch is a different relative strength, normalized so that they all appear with the same relative level of brightness and contrast. When a background model (ABE) is created for each sub the underlying problem is made apparent. Notice the model of the 60 sec gain0 sub. There are only 11 levels of dynamic range in this image. Once stretched and processed the result will be very blotchy and posterized - there simply isn't enough data in the sub to work with. Note that one of the reasons I purchased this camera was to get higher dynamic range, 16bit vs the 12bit of the ASI1600. At gain0, 60sec, the result is worse than that of the 1600.


However, when setting the gain to 100 and increasing the exposure time to 120sec the dynamic range is greatly improved. At Gain100_120sec the mean ADU of the image is 1071, twice that of the comparison dark frame.

Reviewing the specs of the ASI2600 suggests that Gain100 should be the optimum setting as there is lower read noise at gain 100 than at gain 0, and the dynamic range is almost the same. The down side is that the full well capacity is greatly reduced (16000 down from 49000). So, for long exposures, the lower gain provides some safety in protecting from blown out star images as the camera can hold far more electrons that at gain 100. Since my general process is to take more, shorter exposure subs, the higher gain is the obvious first choice. 

Since my earlier M63 subs suffer from the low dynamic range, I will need to retake that series once the weather clears and the moon is out of the sky - probably next month - and then do the comparison. Stay tuned!

Friday, April 9, 2021

More ASI2600 Testing

The ZWO OAG finally arrived this past Monday and I was able to do some initial testing of the 2600 on the EdgeHD11.

Getting the spacing just right was a challenge but I had ample spacers in my shop, and ZWO provided a good variety with their cameras. 

My final configuration is as shown in the pic below; from left to right - nosepiece to mount to the Moonlite Focuser on the EdgeHD, ZWO OAG, 15mm spacer, ZWO Filter Wheel, 2mm adapter and ZWOASI2600. The placement of the 15mm spacer behind the OAG was chosen to allow the guide camera mounting to clear the filter wheel so that it could be rotated to get the pick-off prism to be centered over the long axis of the sensor. 


Initial test exposures yielded very good results, as can be seen in the following images. Since these are single, unprocessed images (except for stretching), the dust motes and vignetting are obvious.

Starfield 300sec


M82 in Ha 300sec

I was very pleased that the f/10 focal length of the Edge produced even less vignetting at the corners than with the f/5.7 WO GT102. Since I had already verified that proper post processing with good flats eliminated the vignetting with the GT102, I should have no problem with the edge images!

However, the placement of the spacer behind the OAG caused serious vignetting in the guide camera view, so much so that finding guide stars became a big problem.


What I had forgot to account for was the longer path of the light cone entering the guide camera. I needed to add 24mm of spacer to the camera. Now the ZWO's pick-off prism is fairly small, and coupled with the guide camera's sensor distance being a bit excessive the effect is like 'looking through a straw'. This needs to be corrected. I decided to move the 15mm spacer in front of the OAG, mounting the OAG flush with the filter wheel. A thin 0.5 mm spacer was used between the nose piece and the 15mm spacer to act as a stop when the assembly is attached to the Moonlite's 2" adapter. The pick-off prism will be a bit rotated from the center of the sensor's long axis but should still be out of the light cone. Now all I have to do is wait for clear skies to test this out.


Sunday, March 28, 2021

Additional Info on the ASI2600 and Small Filters

With the cloudy skies, or clear skies with a near full moon and/or other activities keeping me real busy (Easter choral group rehearsals as choral director at Crosslife Bible Church) I haven't been able to continue with my testing of the new ASI2600mm, and I'm still waiting for a new OAG to arrive so that I can mount it on my EdgeHD-11.

As I mentioned in my previous blog, I was worried that the 31mm filters would cause serious vignetting on my subs. My first experiment showed that cropping the subs about 10-15% yielded very good results. However, it turns out that with good flats I was able to use the entire sensor and achieve rather excellent results. Here is a simple post-processed image of the Seagull Nebula in Ha.

Seagull Nebula - 4x300sec Ha
GT102 f/5.5

This is very promising. Of course, more testing is needed with all the various filter types, LRGB and the full NB set. And, I still need to test on the Edge.

Friday, February 26, 2021

ZWO ASI2600mm Pro Camera - Initial Tests

After waiting for almost 2 years the new ZWO ASI2600mm Pro camera was finally announced back in early January. The baby brother to the ASI6200 (which has a full frame sensor) the 2600 is the APS-C version, with a Sony IMX 571 sensor. I pre-ordered mine in mid-January, and received one this past Tuesday. 

ZWO ASI2600mm Pro

First step was to power up the camera and get the settings dialed in with SGP. Once I was confident that SGP was controlling the camera I ran the camera for 16 hours taking the all important dark frames, 40 in each set of 30s, 60s, 120s, 180s and 300s duration at -10 degrees Celsius. Since I was interested in the two key gain settings (0 and 100) I took two complete sets of darks. As promised by ZWO, the dark frames showed no amp glow at all! My ASI1600 was able to reach 40-45 degrees below ambient; the 2600 can only muster 35 so I settled on -10 as a good operating temperature. This gets me to 0.00075e/s/pix, which in other words means that a 300 sec exposure will only produce about 0.225 e of dark current noise, well below the 1.0-3.3e of readout noise. Hot summer nights might be a bit of a problem as the limit to run the camera at -10 degrees C is about 77 degrees F. 

On Thursday night I loaded the camera up on the GT102 to get some initial images while I had some clear skies. The moon was out, more than 3/4 full and there were still some high level thin clouds, so results weren't great, and I really couldn't take any broadband images. So I decided to just take a few 300 sec and 600 sec Ha subs on the California nebula.

My biggest concern prior to setting up the camera was that my existing set of filters were only 31mm in size. Calculations indicated that 30-32 mm was the minimum for the GT102 optical configuration so I was really expecting some serious vignetting of the images. I'm not sure yet if the EdgeHD11 (my larger telescope) would fair even worse (will test that scope later), but replacing the filter wheel and filters with all new 36 mm ones is not an option at this time as the cost is prohibitive (well in excess of $4500).  

The initial test images did show the vignetting, as can be seen in the picture below.


Since the aspect ratio of this sensor is much greater than the 1600mm, I could easily accept a 15% crop of the image in the longer dimension and still end up with an image size a bit larger than the 1600mm was able to produce. Cropping the image to 5200x4176 from the original 6248x4176 gives a pleasing, more 'square-ish' result that eliminates the vignetting. 


So far the results look very good. The images hold up to some aggressive stretching in the post processing since the 2600 has a 16 bit ADC, whereas my 1600 had only 12 bits. This is a huge improvement in dynamic range output of 14 stops, which will significantly improve the image sharpness and contrast, and also create smoother and more natural color transitions.

Download times are on par with the 1600, about 6 seconds per image. File size is much larger of course, coming in at 51 Meg per sub.

Once the skies clear up and the moon is out of the way I'll take a complete run of Ha subs on this object so that I can fully calibrate the images with darks and flats. I'll report on that in a future post.


Sunday, January 31, 2021

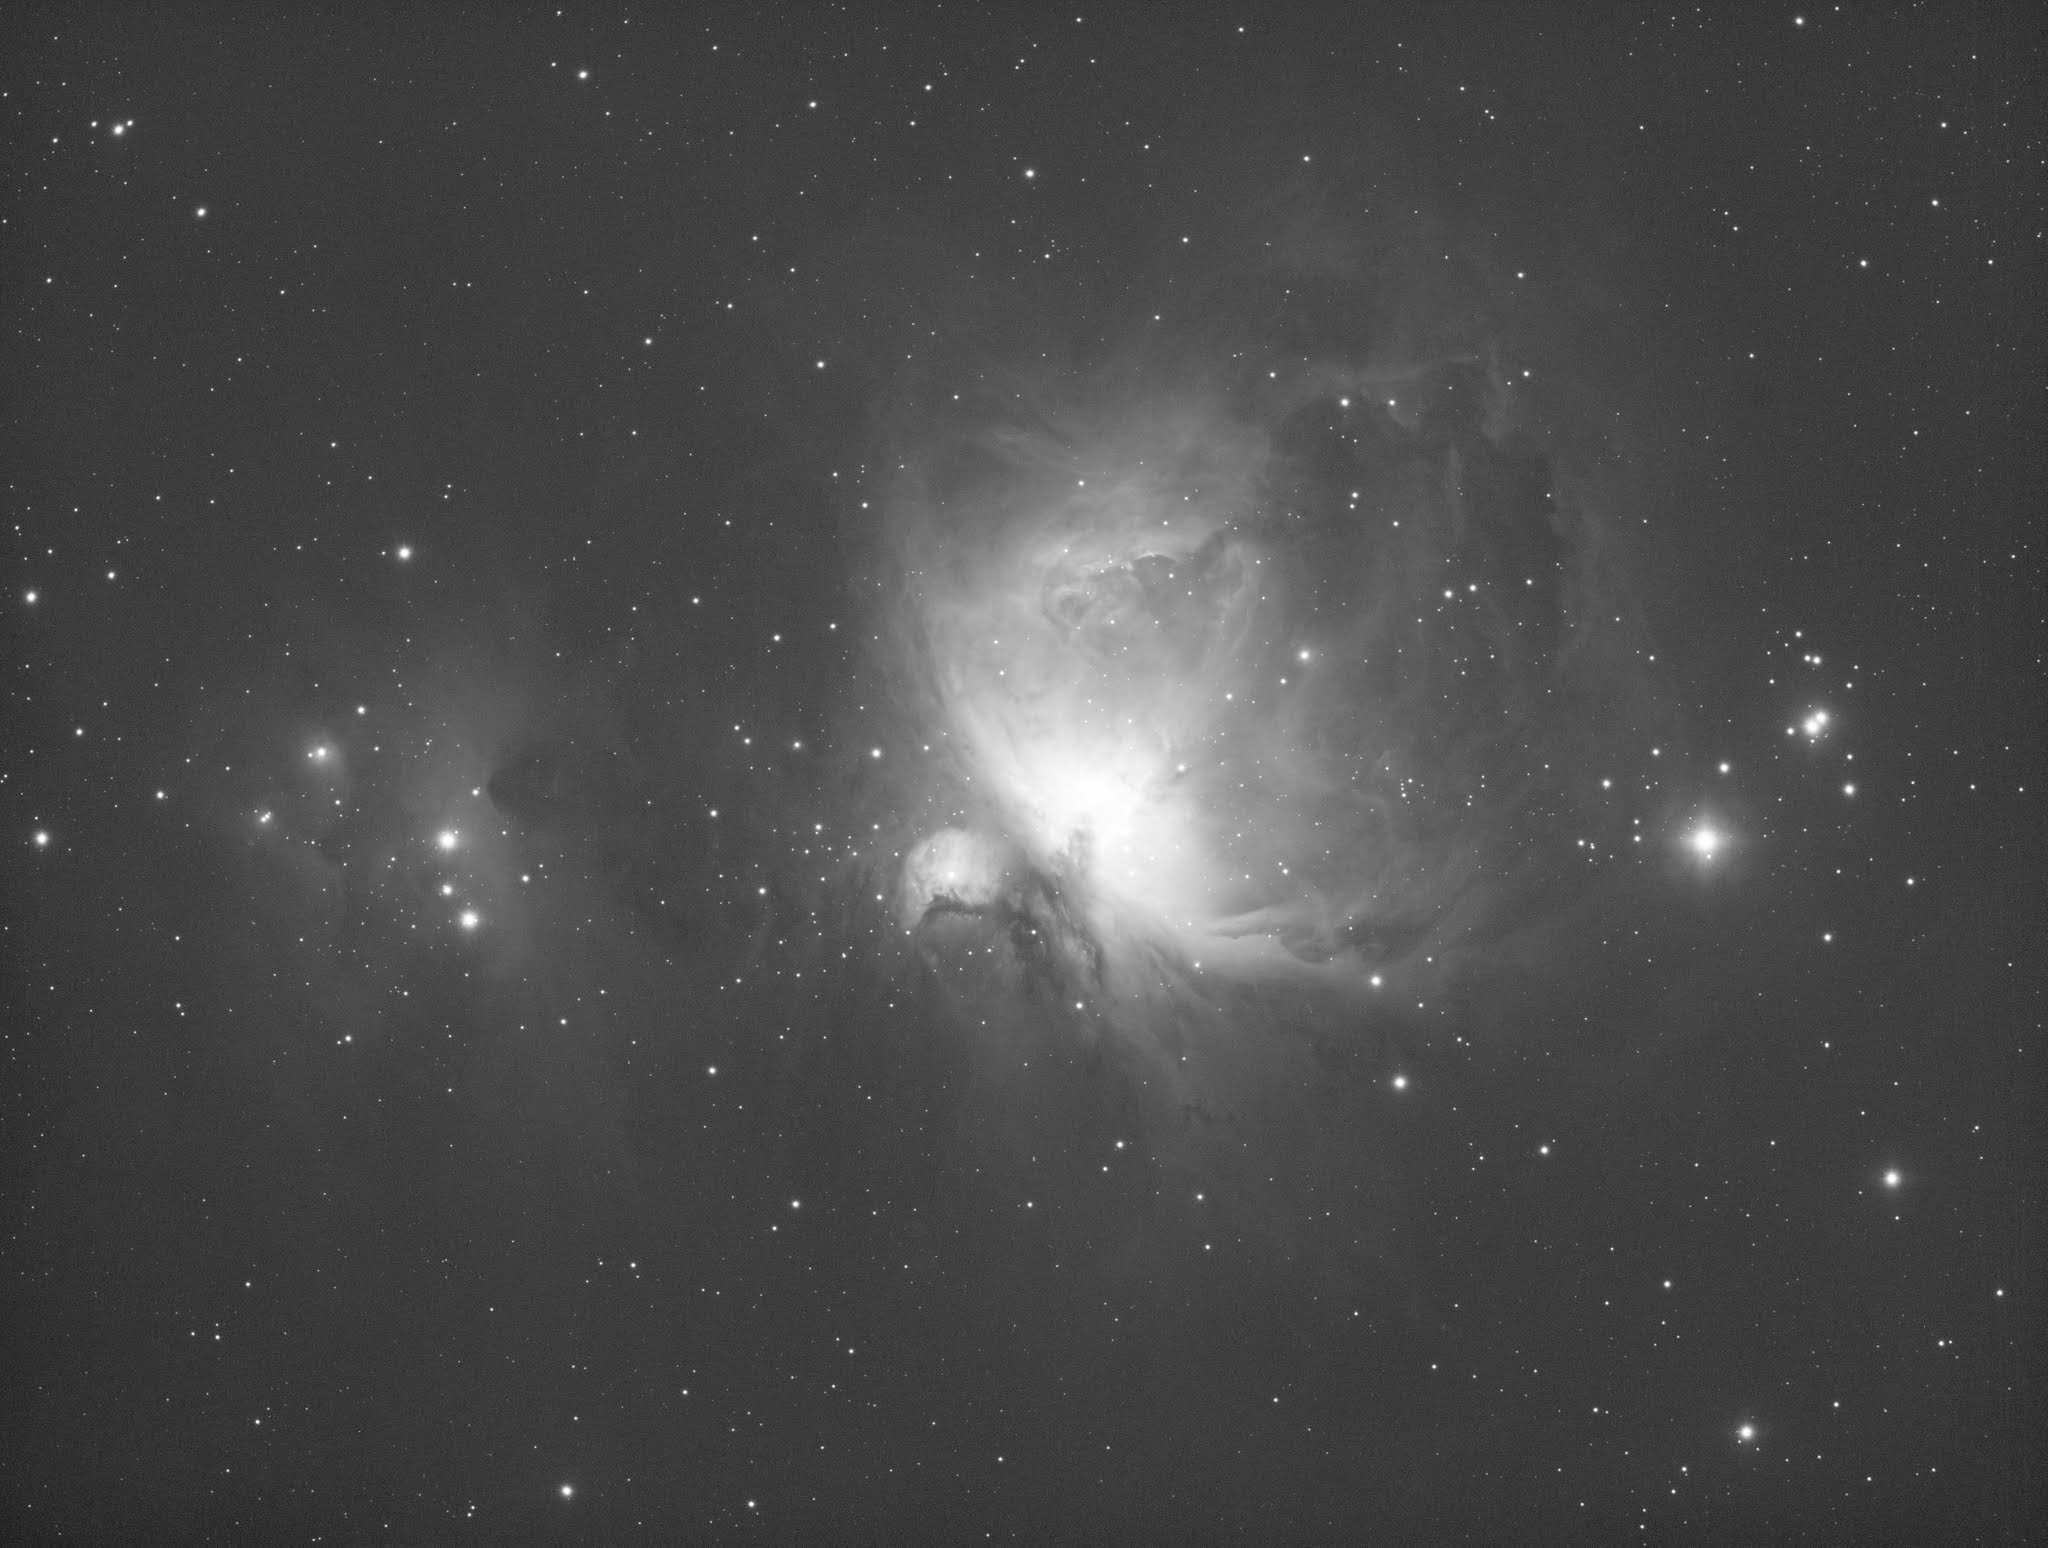
M42 - Orion Nebula

Two weeks ago I posted a blog about the interference from the Starlink satellites on my astro imaging sessions. In that article I explained how the post processing software effectively removes the satellite trails from the images. 

Well here is the final result of those evenings of imaging M42 and the Running Man nebula. I was going to add in some Ha subs, but the result didn't look as good as the standard LRGB.

M42 and the Running Man Nebula - Jan 10-13, 2021
WO GT102 and ASI1600 MM Pro
148x30sec L; 89x30sec R and G; 94x30sec B


Thursday, January 14, 2021

Dealing with Starlink Satellites

Starlink is a satellite internet constellation being constructed by SpaceX providing satellite Internet access. The constellation will consist of thousands of mass-produced small satellites in low Earth orbit, working in combination with ground transceivers. Wikipedia 

Well, that's good news for the needs of the public to gain access to the internet, but its bad news for the amateur astrophotography crowd. It turns out that these satellites can be quite bright and therefore a big problem for ground based observers. And because they are in low earth orbit and there will be lots of them (Starlink alone will consist of 12,000, and other companies are considering satellite constellations of their own) we may not be able to see any part of the sky that doesn't have a satellite passing through.

Astrophotographers take long exposure photographs (some exceeding 10 min in length) to capture the light needed to produce a good image. During that time, plenty of satellites could pass through the field of view and potentially ruin the image. 

In the past few weeks I have started to notice a considerable amount of Starlink satellites passing through my night sky and ending up in my photos. Here is a video of my last set of images of the Orion nebula taken on January 14. This video is a time-lapse of 20 images, each 5 minutes of exposure time (the typical time I use with my camera). You can see the Starlink satellites passing through on the far right, with another, unrelated satellite, passing through the center. This will only get worse as the number of satellites increase over the next few years.

However, all is not lost. Because of the post-processing done on astro images (see my post on image processing here) I take up to 100 subs to combine into a single image to increase the quality of the final photo, decreasing noise and increasing signal. This process can detect which pixels on the image appear on every sub (the signal) and which appear on only one sub (noise, or, in this case, a satellite trail). The processing then stacks the subs together but removes the unwanted pixels. 

Rejection-high


In the photo above, all the bright spots, streaks and lines are the pixels that were detected by my software as present on only a single sub (or were overexposed regions). These will be removed from the final image. You can see the lines of satellite trails on the right and the one that passed through the center. There are some spots throughout the image that will also be removed. These are overexposed areas of the image which are also removed as part of the processing.

The following photo is the processed image where the unwanted pixels were removed.


So, although the proliferation of these satellites will be a challenge for astro-photography, it can be managed. The software we rely on to stack and process our images does an amazing job in tackling the issue of these unwanted photo bombers!


First image from Night Sky Observatory

On September 14, 2026, I completed the majority of the build of my POD-S and installed most of the equipment. The first imaging run in the n...