The Magic of Image Processing - Part I
Over the years I have been asked by friends to explain how I get my beautiful astro-photos, especially from a light polluted sky near Baltimore. Well, the actual process is pretty complicated and sometimes intense, both in the time and effort put into it as well as the techniques used. But I'll try to outline the basic steps.Please note that it is not my intention to provide a detailed account on how this is all done by providing the complete steps, but just to give an overview and high-level look at the workflow. Part I of this post will cover the capturing of the data and the initial calibration and stacking to get a single master frame.
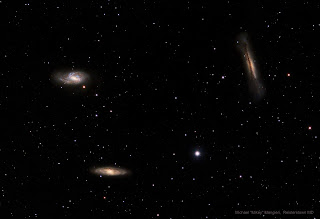
For this example I am using a section of the Leo Triplet image that I posted on Astrobin back in March of this year (see image above). In particular, M65, an intermediate spiral galaxy about 35 million light-years away in the constellation Leo. In the image it is the galaxy in the lower left.
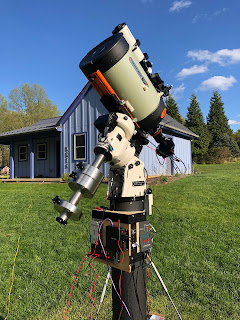
First step, of course, is to actually photograph the object. Although this is not part of the post-processing effort, without it there would be nothing to process! The original photo is a combination of RGB and L subs (subs are the individual photos - many are stacked in the post-processing to create the final image). For the purpose of this discussion I will be using only the luminance subs (monochrome; no color) to make matters a bit simpler. I will be using 64 of the original 70 L subs, each one taken with an exposure of 120 seconds. Images were taken through my 4", GT102 APO refractor with a ZWO ASI1600mm cooled monochrome camera.
Once we have a good set of raw photos (no star trailing, out of focus, airplane trails across the image - yes, happens a lot) they go through three steps: calibration, registration and integration.
Calibration
Images (subs) of our object are known as lights. Since these raw subs contain additional data that we do not want they must be calibrated to remove, or largely minimize, the bad signal from the good signal. What are the bad signals? Thermal noise from the camera itself, uneven light across the field of view and electronic read noise are the three basic ones.The thermal noise is due to the fact that heat from the camera itself builds up and triggers the sensor just as light does. With exposures sometimes exceeding 5-10 minutes per sub this buildup can be rather large. And since the amount of signal is proportional to the temperature of the sensor, the higher the temperature, the more heat signal the sensor collects. This is mitigated to a large extent by cooling the sensor and most astrophotography cameras are equipped with thermoelectric coolers. My camera is typically cooled to -20 degrees Celsius (-4 degrees F) even in the summer.
Uneven light is the vignetting of the image due to the optics of the telescope/camera combination. The intensity of the light fades off as it approaches the edge of the sensor. In addition, dust particles on the sensor glass (and filters) produce faint halos and spots (dust bunnies) on the image.
Then there is the noise produced by the very process of reading the data from the sensor.
Calibration is the process of removing as much of this unwanted data as possible.
To remove the thermal noise, special subs, called darks, are taken which are used to remove the thermal noise from the original lights. These dark frames are subs with the same exposure times as the lights but with the sensor closed off to any light. The signal contained in these dark frames is therefore only from the thermal noise. If we subtract the darks from the lights we get a resultant sub that has the thermal noise removed. This process relies on the randomness of thermal energy and is too complicated to fully discuss here, but you get the idea.
The unevenness of the light frame is corrected by the use of a flat. Flats are subs taken through the telescope in the same configuration as when it was taking the original lights. A uniform light source (the daytime sky through a tee-shirt, or an electroluminescent panel) is used to make sure the sensor receives just the view of the optical train with no subject matter - nice uniform, even light. These flat frames, which contain only the dust shadows and the fall-off along the edges, are then used to correct for the vignetting and shadows by dividing the data on the light by the flat data. Again, a bit complicated.
Finally, bias frames are taken to subtract the read noise from the image. These are taken with no light and exposures of as close to 0 seconds as possible as we only want the information produced from the camera's electronics in reading the data off the sensor. These bias frames are then subtracted from the lights as well. In the case of my particular camera, I don't use bias frames, but use dark flat frames instead. Again, too much to discuss for now.
The following diagram may help to visualize what is taking place.
 |
| Deep Sky Stacker |
I typically create about 40 dark frames to create a single master dark; about 20 dark flats, and 20-25 flats. Multiple frames are taken to reduce the random noise within these calibration frames and produce a more even image.
With my darks, dark flats and flats ready to go I can now calibrate the 64 lights of M65 using a program called PixInsight, my software of choice. This same program will also be used post-calibration to complete the images.
Registration
Registration is the process of aligning each of the calibrated lights to a reference frame so that they all line-up together. Although the telescope is tracking the object closely during the exposure, it is not perfect. And it is actually desirable not to have every frame line up perfectly. I intentionally move each image a small amount when taking the exposures in order to further randomize the noise and other unwanted signal data. This process is known as 'dithering'.
Integration
With all the light frames now fully calibrated and registered its time to combine them all into one master frame. This is the process of 'stacking'. You might have been wondering why we don't just take a single long exposure shot of the object. There are lots of reasons. Remember in the discussion above how the sensor temperature plays into all this? A single 60 minute exposure would produce a lot of thermal signal (probably too much to eliminate). And then there is the guiding. Even a high-end quality mount might not be able to track precisely enough over an extended amount of time (although with accurate polar alignment in a permanent observatory it probably could). Finally there are the other annoyances - i.e., 18 minutes into a 20 minute sub an airplane passes right through the field of view, producing those 'lovely' bright light trails over the image! For these reasons, and one more 'big' reason (to be discussed really soon), we typically take lots of smaller exposure subs and then combine them to get the final image. In other words, take 60, one minute subs instead of one, sixty minute sub.
So, what's that other big reason?
Thankfully, because of the nature of the universe, the way God created it, noise is random. Every time you take an image the information on the camera sensor that was due to thermal and other forms of noise is a little bit different than in the previous image. Over time it averages out to a certain quantifiable level, but every pixel on a frame, and every frame, will have differing levels of brightness - the actual signal from the object (what we want) and some random amount of signal from the noise (what we don't want). Since the object's signal is constant, and not random, the contribution of total energy from the object builds up as you might expect - one unit of signal multiplied by ten frames equals 10 units of signal. But since the noise is random, multiple frames produce a final total noise energy that does not add up uniformly. The contribution due to noise will be slightly less. How much less? Proportional to the square root of the number of frames less. This means that if I double the number of subs, the real signal increases by 2 but the noise increases by 1.414 (the square root of 2). One way to measure this is by calculating the SNR, or signal to noise ratio.
Astrophotographers pay particular attention to the SNR. This is simply the amount of signal divided by the amount of noise. The higher the SNR, the better. So, for example, lets say a sensor pixel picks up 100 photons of light every second. In one second the SNR would be:
But if we expose for 100 seconds (or the average of ten 10-second exposures) we would get a SNR of:
The higher the SNR, the better the final image will be. Therefore, more subs are better than a few subs. In fact, it is not uncommon for astrophotographers to take 60-200 subs (of each filter) to get the final photo.
OK, enough words and theory, lets see what this all really means.
Here is a single light frame of M65 (120 seconds at f/5.6):
OK, enough words and theory, lets see what this all really means.
Here is a single light frame of M65 (120 seconds at f/5.6):
Hmmm, not much showing up! Where's the galaxy?
Well, it's there, just hard to see. Why? Because most of the signal is buried deep in the low end of the image spectrum. This object is rather dim, and so there isn't much signal to capture in 120 seconds.
We are going to detour a bit from our processing discussion to discuss how digital cameras work as this is necessary to understand some of the processing techniques.
For simplicity let's imagine that the pixels on a camera sensor are little buckets. Each bucket can only hold so many electrons. As a photon of light strikes the sensor, an electron is created and is stored in the bucket. My camera, for example, has a sensor that can have data values from 0 to 4095. This is called the dynamic range of the sensor. My buckets can hold up to 4096 electrons.
Now, the higher the data value in a bucket, the brighter the pixel in the resulting photo. Buckets that are empty will produce a totally black pixels in the resultant photo. Buckets that are partially filled will produce varying shades of grey. And, if a bucket fills up completely, you get pure white.
If I was to take a photo of the moon, or some other bright object, the pixels on my camera will fill up pretty fast. And, there would be some that have no data (dark areas) and some that have lots of data (light areas) and some that are in-between. In a completely white, overexposed frame, every bucket would be full (4095 electrons). But in the case of dim objects like galaxies, nebulae, dust clouds, etc., even after exposing the sensor for minutes at a time most of the buckets only fill up a little bit.
So, in the single sub above, the vast majority of buckets have near zero data values (dark space) and only a few have maybe 10-500 electrons in them. So the range of the data in the image is only 0-500 out of the possible 4095. My buckets are only about 1/8th full at best. That's why the end result is pretty unimpressive. The few pixels that have information in them only produce very dark shades of grey, with a few producing some brighter whites.
But what if we multiply each pixel/bucket value by some factor so that each bucket appears nearly full. In the case of the image above, since the largest bucket amount is only 500, if we multiplied each by 8 we would end up with buckets that are filled, or nearly filled, and therefore would create a photo where most of the pixels (that at least contained some electrons) would now have much larger values and therefore appear brighter. We essentially do just that, by a process known as stretching. It isn't as simple as multiplying every pixel with a single value, as the stretch is usually non-linear, but for simplicity the analogy works.
Here is the result of stretching the single light sub.
And there's the galaxy!
But, there's all the noise too. Since we amplified all the sensor data, the noise was amplified as well.
Now, back to the main discussion. Here's where the stacking comes in. Remember how we discussed the fact that noise grows slower than true signal? We use that concept to get an image that contains a lot of data, but over many light subs instead of a single long sub. Thus, we can 'eek out' good data and limit the bad - the SNR gets larger.
The following set of images show progressively larger stack sizes starting with 4-stack and ending with 64-stack; each one twice as large as the previous. You can see how the actual galaxy gets brighter, more detail starts to show and the noise goes down. Note that these have been stretched so you can see the images, but the actual stretching process occurs later in the post-processing steps.
We now have a good master image made up of 64, 2 minute images. The resultant master is basically equivalent to a single sub of 128 minutes, but without the huge amount of noise that a single image like that would have.
In Part-II I will show how we take the master light out of the calibration and integration step and using PixInsight's post-processing routines reduce the remaining noise, enhance the image's detail and adjust the overall quality of the final image. I'll also discuss how color is added to the final image.


