Wednesday, December 30, 2020

New Equipment - Part 2

With a clear sky and full moon I decided to spend the majority of the early evening on Dec 29th to get the remaining software device drivers installed on the new NUC.  Needed to have the equipment connected to do that, so I had to set up the telescope. For some reason I decided I would replace the EdgeHD11 with the GT102 APO that night as well since I eventually want to image some winter nebulae. 

One lesson I should have learned by now is that you shouldn't try to do everything at the same time. I had completely forgotten that in order to mount the GT102 I needed to reset the mount point of the dovetail plate on the mount. By the time I got the mount reset, plate screwed down, and telescope balanced, I had spent about 2 hours of time. I did eventually load the software drivers and configured everything to run on the new NUC. It was time to run a short imaging run to test things out. But by the time I was set, the clouds moved in. Oh well, at least I'll be ready for the next clear night, hopefully soon. 

Friday, December 25, 2020

New Equipment (aka, a Christmas Gift)

Merry Christmas to all. I trust you all had a wonderful Christmas. 

With the Great Conjunction now over (I'm still a little bummed that I didn't get any photos) its time to start working on the next full year of astroimaging. Both 2019 and 2020 have taught me that NUCs (Next Unit of Computing) mini PCs work really well as pier-side computers for running your telescope equipment. But it also taught me that, like in all other areas of technology, astro gear improves over time. My Minisforum GN34 NUC has served me well over the past months, but there were plenty of nights when the unit's speed and capacity were strained with what I was trying to push through it. So I asked my better half for a new one for Christmas, and she knew just which one to get!

So today, after the rest of the activities were done, I started to load up my software on my new BeeLink U57. This unit boasts a 5th Generation Intel Core i5 processor, 8GB of memory, a 256GB SSD and of course plenty of USB3 ports, WiFi, BlueTooth and Ethernet 1000 Mbps LAN, all in a box 124mm x 113mm x 41mm. Comes with Windows 10 Pro, so remote logins are easy.

Software is all loaded and tested. The speed is a large improvement over the GN34. Now I just need some clear skies to put it through the paces. The only annoying part of the adventure so far has been the discovery of the power connector on the NUC. I have custom cabling that runs all my 12v power to my telescope equipment thru Anderson Powerpole connectors and 2.1mm plugs. Of course, Beelink decided that their unit would use a 2.5mm plug. So for this weekend I'll need to run the unit via the supplied 120v to 12v adapter until my new cables come from Powerwerx.

Thursday, December 24, 2020

Great Conjunction

No images for me - the weather just would not cooperate, at least for imaging.  Tried again on the 22nd but no luck.  Some friends dropped by and we all got to view the conjunction for a few minutes while there was a short break in the clouds.  My GT102 with 13mm and 8mm eyepieces provided a wonderful view.


Tuesday, December 22, 2020

Great Conjunction of Jupiter and Saturn

You know, rare astronomical events events occur whether we can see them or not!  Yeah, profound statement (well, maybe not too profound).  But, regardless, such is the life of an amateur astronomer.

Had the telescope and camera gear out on the 20th (since the weather forecast for the day of the event was for overcast skies).  Set up just outside Westminster MD, on the parking lot of my church.  It was very cloudy, but the Lord provided a sliver of clear sky so that I (and the guests I had with me) were able to see the 'near conjunction' visually.  Getting the camera set-up was problematic, and by the time I had the system up and running (software glitches), clouds covered the scene. 

The view was awesome!  Both Jupiter and Saturn were clearly visible, displaying their respective details - Jupiter's cloud belts and Saturn's magnificent ring system. The GT102 (with only 703mm focal length) only provided a small planet size, but no matter, both planets (and a collection of Jovian and Saturnian moons) were present in the same eyepiece field of view. It was worth it!

With Tuesday night promising some clear skies I will try again to image this wonderful event. Yes, they won't be as close as on the 21st, but still should make for a great shot if I can get both planets and the moons to show up in the same image.

Sunday, December 13, 2020

The Great Conjunction of Jupiter and Saturn

Jupiter and Saturn Conjunction - Dec 21, 2020

Just after sunset on Monday, December 21, 2020, our two largest planets will come closer to each other than they have in almost 400 years. A conjunction happens when planets appear very close to one another in the sky because they line up with Earth in their respective orbits. Over the past few weeks, Jupiter has been closing in on Saturn's position. And on December 21st they will be the closest since 1623. 

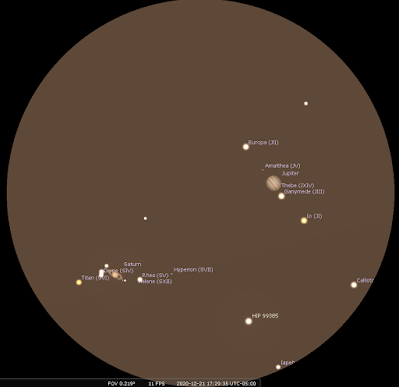
Will they appear as a single "Christmas Star"? Not likely. If you have good eyesight you should be able to make out two distinct points of light, with Jupiter outshining Saturn by 10 times in relative brightness. Look southwest, about a half-hour after sunset (5:15 pm). The planet duo should be visible in the darkening sky. You will need a clear view as the pair will only be 15 degrees above the horizon. Binoculars and small telescopes will reveal a splendid sight, and with sufficient magnification you'll be able to see both planets — Saturn with its famous ring system and Jupiter with its cloud bands and Galilean satellites — simultaneously in the same field of view!

Typical field of view in a moderate telescope at 350x


I will be attempting to photograph this event from my location in Maryland. Using a William Optics GT102 refractor and ASI462 camera I should be able to capture both planets in the same frame.


Monday, October 26, 2020

Mars 2020 - The Magic of "Lucky Imaging"

The best opposition of Mars until 2035 has just passed with the best times to view and image the red planet between late September and mid October. The weather cooperated (mostly) and we were all treated to a wonderful display (without the giant dust storms of 2018).

I was out every chance I got to image the planet when it was the closest and brightest. Mars was well placed, high in the sky. As reported back in early September I imaged Mars with my new ASI462 for the first time. Results were pretty good, but could be improved. Based upon what I've seen on the various astro-boards, my image was about a 4 on a scale of 1-10.  

I imaged Mars on five nights, Oct 2, 13, 14, 21 and 22. Results were generally bad to awful. But on the 22nd I was able to get a respectable image.

Planetary photography is a tricky business. Lots of things can go wrong, and frequently do. The real culprit is the fact that we have a thick atmosphere above us. The twinkling of the stars on a crisp clear winter night is evidence of that atmosphere. Stars are very big, but they are incredibly far away. So far away that they appear as points of light, even in large telescopes. As the narrow beam of light makes its way to the observer it has to pass through various layers of the Earth's atmosphere. As it does the light is refracted and bent to and fro. What we see over time is that beam coming to us from various angles and that makes the star twinkle. 

Since planets are close enough to us that they appear as a disk (although you'll need a telescope to see that), the twinkling effect doesn't occur. Since the disk is composed of lots of beams of light, each randomly refracting, but all in different directions at the same time, we see the combination of all them. Thus, instead of a twinkle, planets appear steady. But the disk image distorts over time because the beam combination is different as the air moves between us and the planet. These random fluctuations of the light are a big problem - they cause the planet's disk to 'bubble' and 'wobble' in the telescope's field of view. You may be aware of this if you've ever looked in a telescope or pair of high power binoculars at a terrestrial object during the heat of a summer day. The object appears to rapidly move about; sometimes appearing blurry but every now and then sharpen to crystal clarity (Outer Limit's fans will recognize the phrase). 

So, planetary imagers use a technique known as 'lucky imaging'. This technique is used to record hundreds or even thousands of images over a short time span in order to capture some images when the seeing is momentarily steady. In order to capture this many images in a short period of time though we need a camera capable of high speed imaging. The ASI462 is one such camera - a video camera for astrophotography. But, just like with deep sky imaging, the process is rather involved.

On the evening of October 22 seeing conditions were pretty good, about 3 or 4 on a five point scale with 5 being the best. My location is not all that great for planetary imaging since my telescope location is within a 'bowl' of terrain surrounding by trees, and the denser air settles and swirls about around my property. I set up and waited for the scope to reach ambient temperature and for Mars to rise higher in the sky (the higher the better - less air mass to image through). 

At 9:53 PM I set the system to capture Mars over a total exposure period of 6 minutes. The camera was set to take 45 frames per second, at 5ms per frame. I was able to capture 27,415 images on this run.

Here is a sample of 50 frames from the beginning of that run. This video was taken with my ZWO ASI462 through an EdgeHD11 telescope equipped with a Televue Powermate 4x teleconverter. This makes my EdgeHD equivalent to an 11" f/40 (11700mm) telephoto lens!


As you can see the image moves quite a bit. But this is actually a nice run. But even in the short 1-2 second clip you can see areas of the image that appear sharper for a fleeting fraction of a second. With over 27,000 images all we need do is locate the best images from the set. That's where AutoStakkert comes in. 

AutoStakkert is an image stacking software. As the author Emil Kraaikamp puts it: 

"AutoStakkert!  is all about alignment and stacking of image sequences, minimizing the influence of atmospheric distortions (seeing). Its goal is to create high quality images of the Planets, the Sun, and the Moon, without too much hassle".

AutoStakkert takes the video and processes the individual frames finding the 'best' of the bunch as per specific parameters set by the user. I usually ask for the 20% best. If the time is kept short, this is all that needs to be done to get a stacked image of the selected frames. But since I was exposing for a full 6 minutes, the rotation of the planet needs to be taken into account. After all, Mars rotates almost the same as Earth; 24 hours, 39 minutes, and 35 seconds to be exact. In a period of 6 minutes, Mars would rotate about 1.46 degrees, probably enough to cause some blurring of the image (although considering all the other factors I had to deal with, probably unnoticeable). To compensate for the planet's rotation, I use another software tool called WinJUPOS. This tool will take the video from AutoStakkert, along with the stacked image, and de-rotate it so that the movement due to planetary rotation is cancelled. This de-rotated version of the video is then reprocessed once more with AutoStakkert to produce a final stacked image. In my case, 5,483 frames of the original 27,415. The resultant image is shown below:


With the stacked image and de-rotation taking care of much of the seeing perturbations we now have a much cleaner image. But it's still not as sharp as we would like; the air turbulence is still causing some blurriness. The detail is trying to come out.

Next up, and the next to final step in the imaging process is to apply discreet wavelet transformation on the image to remove as much of the noise as we possibly can and sharpen the image, bringing out the details that are there, but covered up by the noise in the image. I do this with a tool called Registax. Once the proper parameters are set (which in itself is a time consuming trial and error process) the final image comes to life - and the results are magical.

Mars 10/22/2020 - EdgeHD11 fl=11,700mm
ASI462 - 6min - 5,483 frames

A final pass with Paint Shop Pro to enhance the color and adjust the brightness and contrast and I'm done. A rather successful night. Still not as good as what I see other amateurs accomplishing, but good enough for me. In the image you can see the polar cap, Mare Sirenum (the dark patch just to the right of center) and Amazonis the bright area on the bottom half. The most recognized region, Syrtis Major, is on the opposite side of the planet when this image was taken. It will be centered in early to mid November, and if the skies are clear I'll attempt to capture one more image for the record books. Mars and Earth will be separating rapidly during the next few weeks and so the image will be smaller. 

Tuesday, September 29, 2020

Cosmic Strings from the Big Bang?

Not much happening in my astrophotography endeavors, other than I'm busy processing the data I captured from the 5 straight nights of clear skies - thank the Lord!


But I came across this article in Quanta Magazine which was a real eye opener. Has to due with the possibility that cosmic strings may be giant filaments left over from the birth of the universe. Strange stuff ... read the article here:  Quanta MagazineGo there even if you're not interested in string theory - the opening graphic is awesome.

Monday, September 7, 2020

Getting ready for Mars' Opposition

In just a few weeks, October 13, 2020,  Mars will be the closest to earth since July 27, 2018. And, it won't be closer until 2035!  Back in 2018 I did try to photograph the red planet, when it was a bit closer than it will get this year, but a number of circumstances made it a not-so-great opposition. It was, by all accounts, supposed to be a great opposition (For information about the 2018 event you can head on over to an article in EarthSky by Bruce McClure). And in many ways it was.  But I ran into a number of problems.

First, Mars was low in the southern sky. Since it's orbit is inclined to the ecliptic, it's position at each opposition depends on where it lies on the orbital plane relative to earth. Second, the weather didn't cooperate. Lots of cloudy nights kept me from getting any good images. And the clear nights the atmosphere was very turbulent. Finally, the third obstacle was also weather related - Mars' weather that is! A super dust storm covered the whole planet for most of the time while it was close to the earth.

This year, things are different. It will still get really close (about 38.9 million miles vs. 35.9 million in 2018). That will make Mars appear as 22" in diameter; in 2018 it was 24" (a " is an arc-second; each arc-second is 1/3600 of a degree) well within the capability of my equipment. Then, the position is very much favorable, as Mars will get high in the sky, at a declination of 5 degrees (vs -25 degrees back in 2018). Whether or not the weather (on both planets) cooperates or not is any one's guess.

Planning for this opposition has been underway, and I've been configuring my new ASI462MC planetary camera over the past few nights in preparation for the event. A new Televue Powermate 4x is still on order, but should be arriving soon. This lens will be able to further magnify the image provided the atmosphere is steady enough to allow its use (always a problem here in Maryland). 

Mars Sept 5, 2020
EdgeHD11; ASI462mc f/25
Stacked 4000 frames of 20,000


My first test image turned out quite well. Taken in the wee hours of September 5th after significant processing I was able to get some pretty good detail to show up. And, no dust storms.

October should provide a great opportunity to get some really nice images. 

Saturday, August 29, 2020

The Magic of Image Processing, Part 2 - Selection of Image Subs

In my previous post on the The Magic of Image Processing - Part 1, I discussed the capturing of the data and the initial calibration and stacking to get a single master frame.  It is a well known fact that stacking lots of subs yields better signal to noise ration (SNR). After all, that's why we take lots and lots of images. We want to reduce the overall noise as much as possible to achieve the best possible image at the end. In that article I showed how this stacking process yields a final master that we then use to produce the final image. What I did not mention is that we go through a process of selecting only the best subs before the stacking is completed.

Stacking all the subs taken on a given evening of imaging is not ideal because some may be degraded in some way. The obvious issues are subs with airplane (or satellite) trails in them, shifting images due to sudden movement of the mount, etc. We generally want to only use the best subs we have. Now I know it's tempting to use all the subs captured, especially since clear nights are hard to come by and who wants to throw away precious images. But how do you know what's good enough? Where do you draw the line?

Excluding the obvious cases of ruined subs, there are two key measures that I look at when deciding which subs to keep and which to reject. They are the eccentricity (E) and the Full Width Half Maximum (FWHM) values of the image. 

Photographing a faint nebula or other deep space object requires long exposures of up to 10 minutes or more. The telescope mount must counter the earth's rotation so that the image stays fixed in the camera's view. But, no matter how good the mount is, there is always opportunity for the image to drift. Wind and mount gearing issues are a couple of the things that can effect absolute perfect tracking. Whenever the tracking fails (either it doesn't keep up with the earth's rotation, or speeds up for some reason) stars appear elongated, or 'eggy' and image details suffer. The measure of this 'eggyness' is the eccentricity. Stars with eccentricities of 0 are perfect disks. Eggy stars have E values in excess of 0.6. It turns out that the human eye will accept an object as 'round' as long as its eccentricity is 0.42 or less. With that in mind, I will usually set my software to accept subframes where the star images have eccentricities of 0.5 or less, allowing a little bit of extra freedom. 

The second measure, FWHM, is a measure of the quality of an astronomical image based on how much the telescope and atmosphere have smeared a point source in an image over several pixels on a camera's sensor. When the atmosphere is very unsteady, the light from a distant object does not fall on the same location on the sensor over time. Since it is refracted, or bent, as it moves through the various layers of air, over the duration of an exposure the light is smeared out and is not as distinct or sharp as it could be. Ideally a star should produce a fairly small disk on the sensor. Bad seeing makes this disk much larger, and the star appears bloated. Of course, all the data is equally smeared, so the overall image appears soft and blurry. Since none of us can afford time on the Hubble Telescope, we must deal with the effects of the atmosphere on our images.

I have found that FWHM values of less than about 6-8 produce good results. The actual value changes with the camera, telescope and focal length, but you generally want the smallest FWHM value as you can get. And, during the night, the FWHM can change, usually because of clouds, water vapor, and other atmospheric phenomena. 

The software I use, PixInsight, provides a function that calculates these measures (and others) as part of a subframe selection process. When I have all the subs for a given object, I run the Subframe Selection tool to measure the values of E and FWHM. Based on the results I decide what subs to keep and which ones to reject. 

Recently I have collected a number of subs of the famous Pillars of Creation, near the center of M16, the Eagle Nebula. I still need to collect more before I can complete the final image, but I do have sufficient Ha subs that I can use to show the effect of E and FWHM on a completed master.


The image on the left is a stacked image of subs that had eccentricities > 0.45.  On the right, the E values were <= 0.45. You can see that the stars are more distinct and rounder.


The image on the left is a stack of subs with FWHM > 8, while the one on the right < 8. The stars are less bloated and the overall image is clearer (although the eccentricity issues are still there).

As you can see both images on the right are improved over the ones on the left. If I stack both sets of subs, low E and FWHM I get the ideal master (it is very noisy since it is composed of only 8 subs) with the clarity that the best subs can produce.


Even this final master exhibits some minor bloating, and it looks like there is still a small issue with eccentricity, but that will be improved when the full set of subs are combined.


Wednesday, August 19, 2020

Radio Telescope damaged - SpaceTime is weird - Asteroid Near Miss

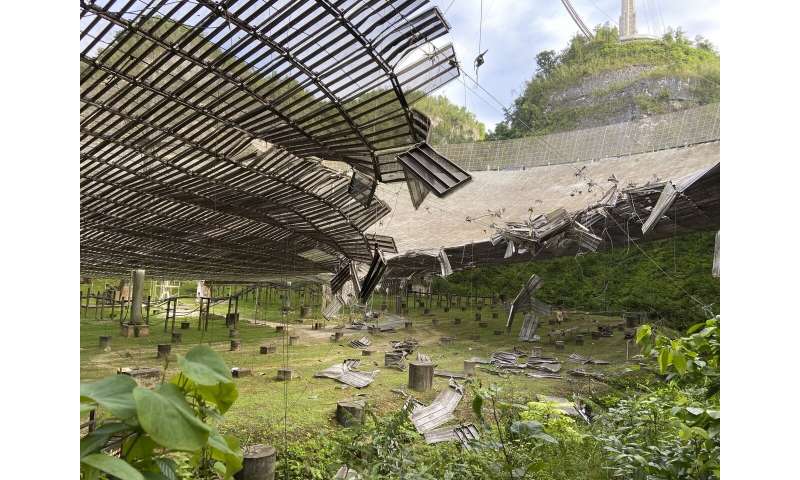
Arecibo Observatory Damaged

A broken cable caused severe damage at Puerto Rico's Arecibo Observatory, causing a suspension of operations for one of the world's largest single-dish radio telescopes.

Broken cable damages giant radio telescope in Puerto Rico 

Complete story at:

Phys.org 


Spacetime is Weird

For those of you who are interested in special and general relativity, spacetime and all that stuff, this is a really good read. Ethan Siegel, senior contributor at Forbes does a really great job of explaining some of the mysteries of our universe - indeed our very existence.

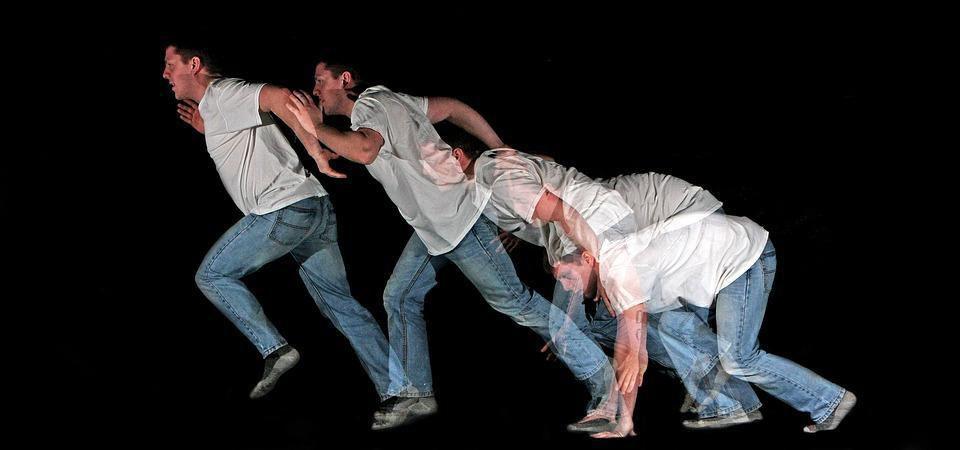
Both space and time coordinates are needed to describe an object in our Universe.

Read the article at Forbes


Record Breaking Close Encounter

A car-sized asteroid just made the closest-known approach to Earth without actually colliding with the planet. And researchers didn't even know about it until hours after it had already passed.

Asteroid 2020 QG, formerly known as ZTFoDxQ, zoomed past Earth on Sunday at 12:08 a.m. EDT, getting as close as 1,830 miles away. It marks the closest asteroid flyby ever recorded in which the object actually survived, according to NASA. (CBS News)


Monday, August 3, 2020

New Crayford focuser installed

One of the issues with the EdgeHD telescopes (actually, most SCTs) is that they are notoriously difficult to focus especially when trying to image with them. The reason is simple - focus is accomplished by moving the main mirror up and down the optical tube. Although the mirror can be locked in place once focus is achieved, as soon as the temperature changes the optical path alters a bit and the focus needs adjustment.  You can't do that remotely - you have to go out to the scope, unlock the mirror, go back inside, refocus, go back outside, lock the mirror and then continue. So I haven't been locking the mirror, just refocusing periodically throughout the night.

Another problem is that as you focus in and out the image shifts. This is because the mirror tilts a bit as it moves. And, during the night as the scope alters it's orientation to the ground, the mirror moves as well. All of this makes it hard to keep getting in-focus images during long sessions.

Well, there is a solution, and it's called the CHL 2.5 inch Large Format Crayford EDGE focuser from Moonlite.  This piece of equipment mounts on the rear of the OTA before the rest of the imaging train (OAG, Filter Wheel and Camera). Now the mirror is locked down tight and focus is achieved by moving the drawtube holding the imaging train in and out, much like a standard refractor telescope. No more mirror flop, no more shifting image, just a smooth focus operation.

I purchased one a few weeks ago, and finally got around to installing it on my scope. There were some issues getting the focus point to reach the critical 146mm. Because the Celestron Off Axis Guider I use is so wide, there wasn't a whole lot of wiggle room getting everthing connected, but it's all set up and I tested it a few days ago. And the results are outstanding. Here is a test image of a star field showing the results.


No only are the stars tack-sharp, edge to edge, but the light cone is now almost perfectly centered on the camera sensor (probably a side effect of not using any spacers so now the imaging train is really solid).  The guide camera still needs to be adjusted to support guiding, but I'll do that later this week. I might add that since I didn't have the guide system working, this test image (15x30sec) was unguided! This simply demonstrates the quality of the AP1100-GTO mount that I got back in April.

Once hurricane Isaias passes by (and the water drains) I'll complete the calibration and be ready to image once again - only now with a much better focuser in play.

Soldiers Delight Star Party - The Role of Telescopes in Astronomy

  Soldiers Delight Star Party - August 15, 2026 Don't miss the next SD Star Party - this Saturday evening! "The Role of Telescopes ...